A fellow forum member approached me to dual mod his arcade joystick so it can work on the PS3 and XBOX360 platform. I was contemplating of installing a dualshock1 PCB but realising the converter for the consoles will take longer than expected to arrive, I decided to break out my PS360 pcb from Aki-Custom to get the job done.
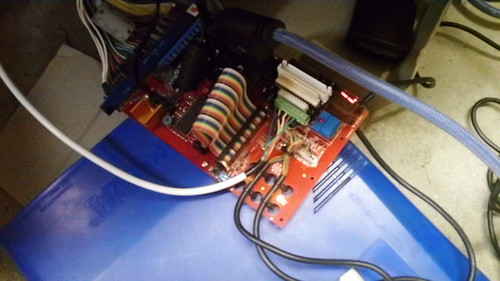
Upon opening the stick, 2 things struck me:
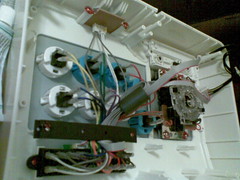
1. A magnet to shield thin wires. Presumably to negate the need to twist the wires in a spiral to improve conductance or something like that.
2. Individual activation and ground terminals for each action buttons...nice, avoiding daisy chaining sits fine with me.
As you can see here the joystick harness is MadKatz own...*SNIP*
And also the buttons output with a common ground wire...*SNIP* *SNIP*
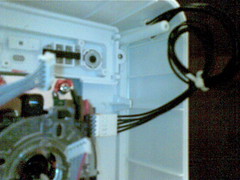
I removed the home, turbo, etc pcb to solder 2 sets of wire so the home and turbo button can still be accessed. Since I will be taking out the original Wii pcb out of the equation, it will be treated just like 2 switches.
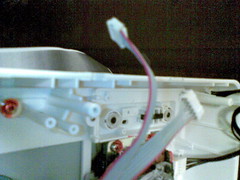
Next I found the sweet spot to install the pcb. The 2 bottom legs matched the screw holes for the PS360 and it holds it well.
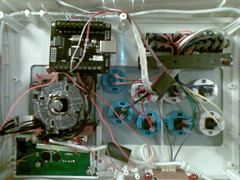
Finally I rigged all the switches as indicated on the PS360 pcb and ran a full input/output test using my voltmeter (set on continuity test) and luckily no further adjustment was needed on the terminals. So its all good to go. Have fun Euuuge!
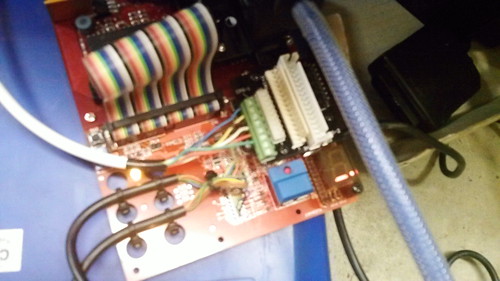
The PS1/2 Expansion board for the Viletim Scart to JAMMA adapter (with the kick harness)
This is an expansion board to be attached to the Scart to Jamma adapter and it will generate signals that you will otherwise produced by a playstation dualshock1 or dualshock2 pad. The outputs to the console of choice shall be provided by standard playstation console ports so an additional adapter will be needed to interface to say an xbox1, xbox360, PS3, Wii, Dreamcast etc. The compatibility is spot on for the xbox1, xbox360 and PS3 adapters that I have on hand, which works the same way as my dualshock1 pcb based arcade sticks.
The expansion board will take care of the directional buttons, start, Fire1, 2 and 3 on the control panel of any standard JAMMA cabinet, if you need Fire 4, 5 and 6 (such as for fighting games etc) you can hook up either a mortal kombat, CPS1 or CPS2 Kick harness or wire the buttons directly to the [u]additional[/u] kick expansion's terminal blocks.
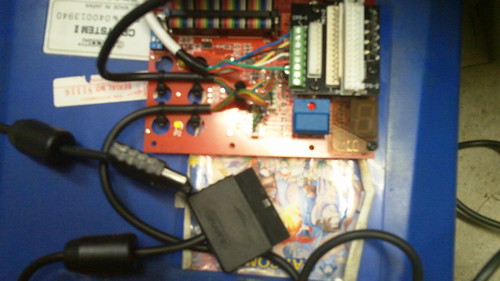
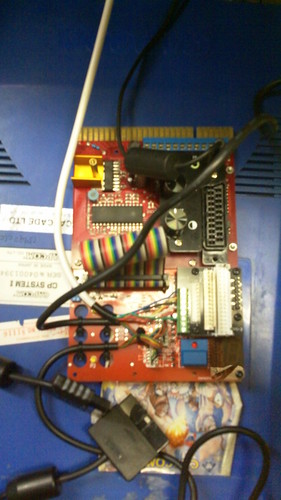
Installation: You will need to remove the control expansion board from the scart to jamma adapter, by removing the ribbon cable and the three nuts and screws, and then do the reverse for the ps1/2 expansion board for installation.
Initialisation: You will need to connect the expansion board to a console and turn it on, it doesn't matter if its directly to a playstation console or through adapters, but best to connect both player 1 and 2 controllers to the console as the initialisation process will do both players at a time and to maintain power to the expansion board as it draws power from the controller ports of the console.
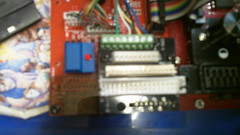
"The interface is manipulated entirely with SW1, the blue keyswitch. There are also some indicators:
Yellow player 1 LED -- P1 Light Yellow player 2 LED -- P2 Light Red seven segment display -- Display Red SW1 LED (on the blue keyswitch) -- SW1 Light
The SW1 Light will come on when SW1 is depressed and go out when released. When in programming mode the SW1 Light will remain on until you have gone through the programming procedure.
The memory is blank to start with. You will need to set up at least one profile before the device is useful. The Display will show "_" which is the new profile indicator. Because there is nothing to do in normal mode at this stage, I will begin with a description of programming mode.
Programming Mode
Hold down SW1 for six seconds or more and release. The SW1 Light will stay on to let you know you're in programming mode.
At this moment P1 Light and P2 Light will both be off.
The Display will alternate between "I" and "II" every second. Press SW1 at the right time set Dual Shock or Dual Shock 2 emulation. In theory there should be no difference between the two, but the option is there to ensure compatibility
The next step is to set up all the inputs. A function will show on the display, you then assert any input(s) you want to associate with that function. If you do not want to use this function, press SW1 to skip to the next function. If you want to associate multiple inputs to the same function then assert them together. When it detects that there are no longer any inputs asserted it will skip to the next function.
At this point the P1 Light will come on.
01. "0" Player 1 d-pad up 02. "1" Player 1 d-pad down 03. "2" Player 1 d-pad left 04. "3" Player 1 d-pad right 05. "4" Player 1 start 06. "5" Player 1 select 07. "6" Player 1 triangle 08. "7" Player 1 circle 09. "8" Player 1 X 10. "9" Player 1 square 11. "A" Player 1 L1 12. "b" Player 1 L2 13. "c" Player 1 L3 14. "d" Player 1 R1 15. "E" Player 1 R2 16. "F" Player 1 R3 17. "G" Player 1 left-analog up 18. "H" Player 1 left-analog down 19. "I" Player 1 left-analog left 20. "J" Player 1 left-analog right 21. "K" Player 1 right-analog up 22. "L" Player 1 right-analog down 23. "M" Player 1 right-analog left 24. "n" Player 1 right-analog right 25. "o" Player 1 analog button 26. "p" Player 1 select + start combination 27. "q" Player 1 select + L3 combination
The P1 Light will go out and the P2 Light will come on.
28. "0" Player 2 d-pad up 29. "1" Player 2 d-pad down 30. "2" Player 2 d-pad left 31. "3" Player 2 d-pad right 32. "4" Player 2 start 33. "5" Player 2 select 34. "6" Player 2 triangle 35. "7" Player 2 circle 36. "8" Player 2 X 37. "9" Player 2 square 38. "A" Player 2 L1 39. "b" Player 2 L2 40. "c" Player 2 L3 41. "d" Player 2 R1 42. "E" Player 2 R2 43. "F" Player 2 R3 44. "G" Player 2 left-analog up 45. "H" Player 2 left-analog down 46. "I" Player 2 left-analog left 47. "J" Player 2 left-analog right 48. "K" Player 2 right-analog up 49. "L" Player 2 right-analog down 50. "M" Player 2 right-analog left 51. "n" Player 2 right-analog right 52. "o" Player 2 analog button 53. "p" Player 2 select + start combination 54. "q" Player 2 select + L3 combination
Now both the P1 Light and P2 Light will be on.
55. "/" Select next profile
Note that for 'Select next profile' function to be useful, it should be associated with the same input in every profile.
56. "=" Rapid fire
The rapid fire function works a bit differently to the others. Once you are up to this stage, simply assert any input that you wish have the rapid-fire ability. You can assert them one at a time or together, it doesn't matter. Once you are finished, press SW1. If you press SW1 without asserting any inputs, none of them will have rapid-fire.
This is the last step in the programming procedure. The profile will now be saved to internal memory and you will now be sent back to normal mode. The memory can hold up to 16 different profiles (0,1,2,3,4,5,6,7,8,9,0,A,b,c,d,E,F).
Normal Mode
The P1 & P2 Lights serve the same function as the Analog light on a Dual Shock controller. The current profile can be selected by pressing SW1 or asserting an input associated with the 'Select next profile' function (if it has been set up correctly). To create a new profile press SW1 until the Display shows "_" and hold SW1 for at least six seconds to enter programming mode. If you would like to overwrite an existing profile then hold SW1 while the profile you would like to overwrite is selected. If you would like to delete a profile, hold SW1 while the profile is selected and enter programming mode. While in programming mode press SW1 over and over to skip every function. This will effectively delete the profile.
SW3 adjusts the rapid fire rate.
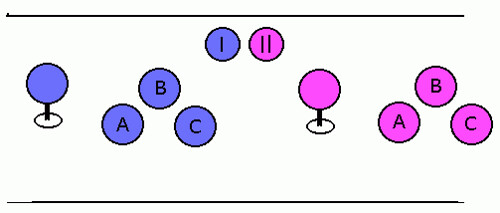
Example
If you had a control panel with the layout above and wanted to program it like so: Blue joystick - P1 D-pad Blue A button - P1 square Blue B button - P1 triangle Blue C button - P1 X Pink Joystick - P2 Left analog stick Pink A button - P2 square Pink B button - P2 triangle Pink C button - P2 triangle rapid fire Blue I button - P1 start Pink II button - P1 select
You would enter programming mode, select either Dual Shock or Dual Shock 2 mode, then enter the data like so:
At this point the P1 Light will come on.
01. "0" Move blue joystick to up position 02. "1" Move blue joystick to down position 03. "2" Move blue joystick to left position 04. "3" Move blue joystick to right position 05. "4" Press blue I button 06. "5" Press pink II button 07. "6" Press blue B button 08. "7" Press SW1 09. "8" Press blue C button 10. "9" Press blue A button 11. "A" Press SW1 12. "b" Press SW1 13. "c" Press SW1 14. "d" Press SW1 15. "E" Press SW1 16. "F" Press SW1 17. "G" Press SW1 18. "H" Press SW1 19. "I" Press SW1 20. "J" Press SW1 21. "K" Press SW1 22. "L" Press SW1 23. "M" Press SW1 24. "n" Press SW1 25. "o" Press SW1 26. "p" Press SW1 27. "q" Press SW1
The P1 Light will go out and the P2 Light will come on.
28. "0" Press SW1 29. "1" Press SW1 30. "2" Press SW1 31. "3" Press SW1 32. "4" Press SW1 33. "5" Press SW1 34. "6" Press pink B button and keep it held down, then press pink C button, release them together. 35. "7" Press SW1 36. "8" Press SW1 37. "9" Press pink A button 38. "A" Press SW1 39. "b" Press SW1 40. "c" Press SW1 41. "d" Press SW1 42. "E" Press SW1 43. "F" Press SW1 44. "G" Move pink joystick to up position 45. "H" Move pink joystick to down position 46. "I" Move pink joystick to left position 47. "J" Move pink joystick to right position 48. "K" Press SW1 49. "L" Press SW1 50. "M" Press SW1 51. "n" Press SW1 52. "o" Press SW1 53. "p" Press SW1 54. "q" Press SW1
Now both the P1 Light and P2 Light will be on.
55. "/" Press SW1 56. "=" Press pink C button (and release), then press SW1
done"
The mapping process is quick as the expansion board will register the immediate button for the function as soon as you press it and leaving no down time before the next button is pressed. You can store multiple profiles as shown and to get to the next profile, just click once on SW1 and it will show the next profile, which you can program or set the controller profile to.
Overall impression:
The kit is intended for those who dislike pad hacking and Tim has made sure it will cater to those who wish to have further customisation to their control layouts and rapid fire options. Further improvements will be introduced before the release including a diagnostic mode, which will point out any shorts or cross input errors on the cabinet side of things as well as better power management as the current build has niggly power issues causing the expansion board to malfunction. Other than that, it fulfils the promise of two functional dualshock pcbs. It has a tentative price of AU$40-45 for the main interface board and AU$10-12 for the kick harness adapter. Contact Tim at orders@etim.net.au for further enquiry.